Important
The use of a Staging Host, referred to as the Staging Deployment Method, is no longer recommended and is being deprecated, with removal in a future release.
For backwards compatability, the staging deployment method is still supported however it is not recommended for new deployments, and existing deployments should be converted to the INI method of deployment.
The staging host will form the base of your operation for creating your topology. The primary role of the staging host is to hold the software, and to install, transfer, and initiate the services on each of the nodes. The staging host can be a separate machine, or a machine that will be part of the cluster.
To use a staging host, you will need to configure SSH on each machine within the topology which allows the tpm tool to connect and perform the necessary installation and setup operations to create your environment, as shown in Figure B.1, “Tungsten Deployment”.
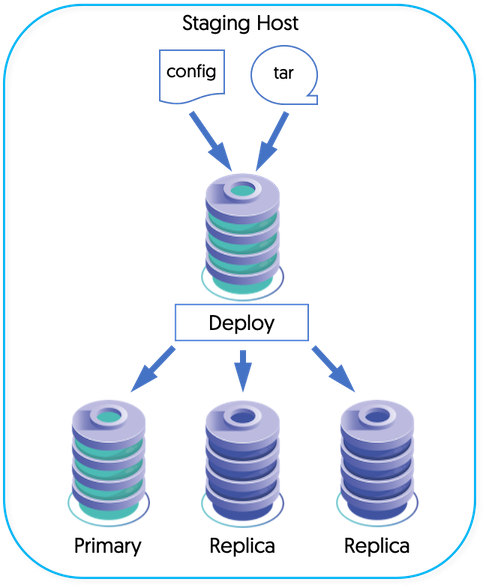
The staging host will be responsible for pushing and configuring each machine. For this to operate correctly, you should configure SSH on the staging server and each host with a common SSH key. This will allow both the staging server, and each host to communicate with each other.
You can use an existing login as the base for your staging operations. For
the purposes of this guide, we will create a unique user,
tungsten, from which the staging
process will be executed.
Create a new Tungsten user that will be used to manage and install the Tungsten software. The recommended choice for MySQL installations is to create a new user,
tungsten. You will need to create this user on each host. You can create the new user using adduser:shell>
sudo adduser tungstenYou can add the user to the
mysqlgroup adding the command-line option:shell>
sudo usermod -G mysql -a tungstenLogin as the
tungstenuser:shell>
su - tungstenCreate an SSH key file, but do not configure a password:
tungsten:shell>
ssh-keygen -t rsaGenerating public/private rsa key pair. Enter file in which to save the key (/home/tungsten/.ssh/id_rsa): Created directory '/home/tungsten/.ssh'. Enter passphrase (empty for no passphrase): Enter same passphrase again: Your identification has been saved in /home/tungsten/.ssh/id_rsa. Your public key has been saved in /home/tungsten/.ssh/id_rsa.pub. The key fingerprint is: e3:fa:e9:7a:9d:d9:3d:81:36:63:85:cb:a6:f8:41:3b tungsten@staging The key's randomart image is: +--[ RSA 2048]----+ | | | | | . | | . . | | S .. + | | . o .X . | | .oEO + . | | .o.=o. o | | o=+.. . | +-----------------+This creates both a public and private keyfile; the public keyfile will be shared with the hosts to allow hosts to connect to each other.
Within the staging server, profiles for the different configurations are stored within a single directory. You can simplify the management of these different services by configuring a specific directory where these configurations will be stored. To set the directory, specify the directory within the
$CONTINUENT_PROFILESenvironment variable, adding this variable to your shell startup script (.bashrc, for example) within your staging server.shell>
mkdir -p /opt/continuent/software/confshell>mkdir -p /opt/continuent/software/replicator.confshell>export CONTINUENT_PROFILES=/opt/continuent/software/confshell>export REPLICATOR_PROFILES=/opt/continuent/software/replicator.conf
We now have a staging server setup, an SSH keypair for our login information, and are ready to start setting up each host.