Deploying a Composite Active/Passive (CAP) Cluster
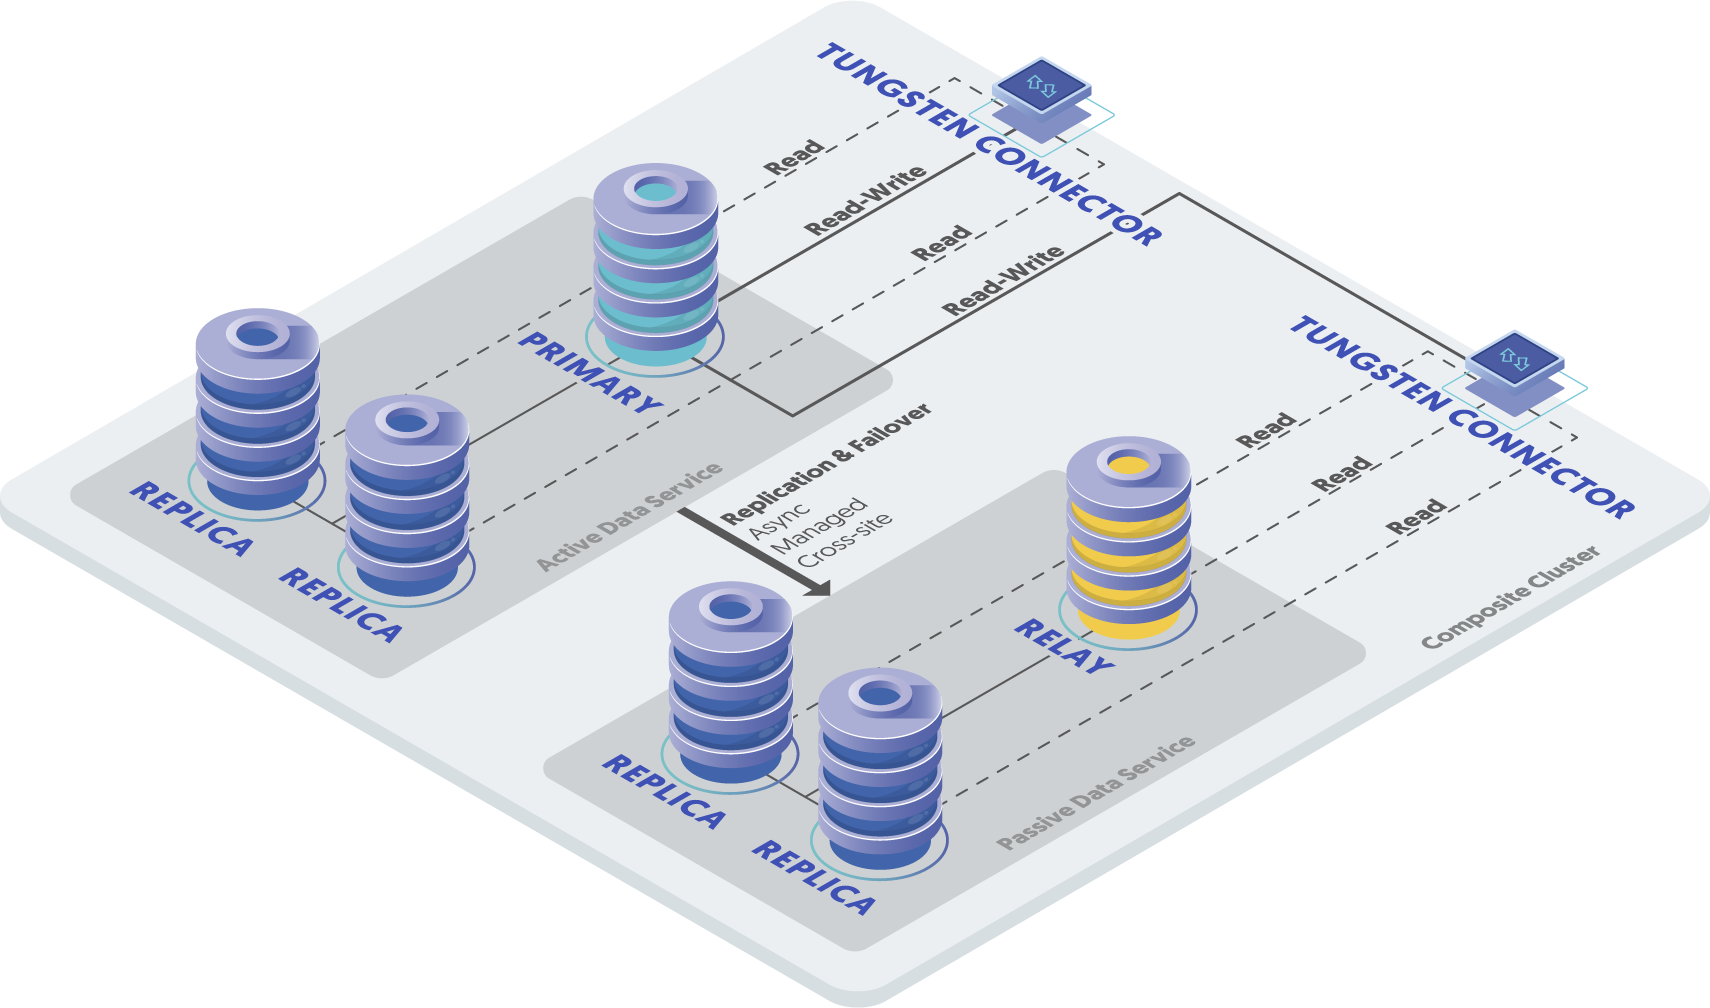
Tungsten Cluster supports the creation of composite clusters. This includes multiple active/passive dataservices tied together. One of the dataservices is identified as the active, containing the primary node and all other dataservices (passive) replicate from it.
Prepare
Before continuing with deployment you will need the following:
- The cluster name for each Active/Passive Cluster and a Composite cluster name to group them.
- The list of datasources in each cluster. These are the servers which will be running MySQL.
- The list of servers that will run the connector. Each connector will be associated with a preferred cluster but will have access to the primary regardless of location.
- The username and password of the MySQL replication user.
- The username and password of the first application user. You may add more users after installation.
All servers must be prepared with the proper prerequisites. See "Installation Prerequisites" for additional details.
Install
Install the Tungsten Cluster RPM package or download the tarball, and unpack it:
shell> cd /opt/continuent/softwareshell> tar zxf tungsten-clustering-8.0.4-132.tar.gzChange to the staging directory:
shell> cd tungsten-clustering-8.0.4-132Create the
/etc/tungsten/tungsten.iniusing the example below as a template. Once created to suit your needs, run thetpmto perform the installation.Example tungsten.ini[defaults]user=tungsteninstall-directory=/opt/continuentprofile-script=~/.bash_profilereplication-user=tungstenreplication-password=secretreplication-port=13306application-user=app_userapplication-password=secretapplication-port=3306rest-api-admin-user=apiuserrest-api-admin-password=secretconnector-rest-api-address=0.0.0.0manager-rest-api-address=0.0.0.0replicator-rest-api-address=0.0.0.0[alpha]topology=clusteredmaster=host1.alphamembers=host1.alpha,host2.alpha,host3.alphaconnectors=host1.alpha,host2.alpha,host3.alpha[beta]topology=clusteredrelay=host1.betamembers=host1.beta,host2.beta,host3.betaconnectors=host1.beta,host2.beta,host3.betarelay-source=alpha[gamma]composite-datasources=alpha,betaShow argument definitions
user=tungstenOS System User, for example tungsten. DO NOT use root.install-directory=/opt/continuentInstallation directory.profile-script=~/.bash_profileAppend commands to include env.sh in this profile script.replication-user=tungstenUser for database connection.replication-password=secretDatabase password.replication-port=13306Database network port.application-user=app_userDatabase username for the connector.application-password=secretDatabase password for the connector.application-port=3306Port for the connector to listen on.rest-api-admin-user=apiuserSpecify the initial Admin Username for API access.Available from v7.0.0rest-api-admin-password=secretSpecify the initial Admin User Password for API access.rest-api-admin-passwordalias only available from version 7.1.2 onwards.Available from v7.0.0connector-rest-api-address=0.0.0.0Address for the API to bind too.Available from v7.0.0manager-rest-api-address=0.0.0.0Address for the API to bind too.Available from v7.0.0replicator-rest-api-address=0.0.0.0Address for the API to bind too.Available from v7.0.0From v7.0.0If you plan to make full use of the REST API (which is enabled by default) you will need to also configure a username and password for API Access. This must be done by specifying the following options in your configuration:
rest-api-admin-user=tungstenrest-api-admin-pass=secretFrom v7.2.0 the alias
rest-api-admin-passwordcan also be used.Run
tpmto validate the installation. Providing no errors are returned, you can then continue to install the software.shell> ./tools/tpm validateshell> ./tools/tpm installDuring the startup and installation,
tpmwill notify you of any problems that need to be fixed before the service can be correctly installed and started. If the service starts correctly, you should see the configuration and current status of the service.Initialize your
PATHand environment.shell > source /opt/continuent/share/env.sh
The Composite Active/Passive Cluster should be installed and ready to use.
Adding a remote Composite Cluster
Adding an entire new cluster provides significant level of availability and capacity. The new cluster nodes that form the cluster will be fully aware of the original cluster(s) and communicate with existing managers and datasources within the cluster.
The following steps guide you through updating the configuration to include the new hosts and services you are adding.
On the new host(s), ensure the "Installation Prerequisites" have been followed.
Let's assume that we have a composite cluster dataservice called
globalwith two clusters,eastandwest, with three nodes each.In this worked exmple, we show how to add an additional cluster service called
northwith three new nodes.Set the cluster to MAINTENANCE mode using
cctrl:shell> cctrl[LOGICAL] / > use global[LOGICAL] /global > set policy maintenanceUsing the following as an example, update the
/etc/tungsten/tungsten.inion the existing nodes to include the new cluster and update the additional composite service block. Then, copy the ini file to all the new nodes in the new cluster.Example tungsten.ini[north]connectorsdb7,db8,db9relay-source=eastrelay=db7members=db7,db8,db9topology=clustered[global]composite-datasources=east,west,northShow argument definitions
relay-source=eastDataservice name to use as a relay source.relay=db7Hostname of the primary (or relay) host within this service.members=db7,db8,db9Hostnames for the dataservice members.topology=clusteredReplication topology for the dataservice.Using the
--no-connectorsoption updates the current deployment without restarting the existing connectors.On all nodes in the new cluster, download and unpack the software, and install
shell> cd /opt/continunent/softwareshell> tar zxvf tungsten-clustering-8.0.4-132.tar.gzshell> cd /opt/continuent/software/tungsten-clustering-8.0.4-132shell> tools/tpm installOn every node in the original clusters, make sure all replicators are online:
shell> trepctl online; trepctl servicesOn all nodes in the new cluster start the software
shell> startallThe next steps will involve provisioning the new cluster nodes. An alternative approach to using this method would be to take a backup of a replica from the existing cluster, and manually restoring it to ALL nodes in the new cluster PRIOR to issuing the install step above. If you take this approach then you can skip the next two re-provision steps.
Go to the relay (primary) node of the new cluster (i.e. db7) and provision it from any replica in the original cluster (i.e. db2):
shell> tprovision -s db2 -m xtrabackupGo to a replica node of the new cluster (i.e. db8) and provision it from the relay node of the new cluster (i.e. db7):
shell> tprovision -s db7 -m xtrabackupRepeat the process for the remaining replica nodes in the new cluster.
NoteFor a full explanation of using
tprovisionsee "The tprovision Command"Set the composite cluster to AUTOMATIC mode using
cctrl:shell> cctrl[LOGICAL] / > use global[LOGICAL] /global > set policy automaticIf you used the
--no-connectorsoption, then during a period when it is safe to restart the connectors, issue the following against each connector:shell> tpm promote-connector